Integration with Ruby on Rails
This guide shows you how to integrate AuthRocket with your Rails app by using LoginRocket. It will use our streamlined Rails integration.
You need to have already created a Realm for your app. If that’s not done yet, do that now or see Your first realm.
Uh oh! Cannot play video. Perhaps Javascript didn't load or this browser doesn't support HTML5?
Walkthough a complete Rails integration. 6 min.
Install the authrocket gem
Start by adding the gem to your Gemfile. The extra require: ... enables the streamlined Rails integration, so don’t skip that.
gem 'authrocket', '~> 3.0', require: 'authrocket/rails'Then run bundle.
Get your LoginRocket credentials
In the AuthRocket management portal, go to Realm -> Integration -> Using LoginRocket, and then select Ruby on Rails.
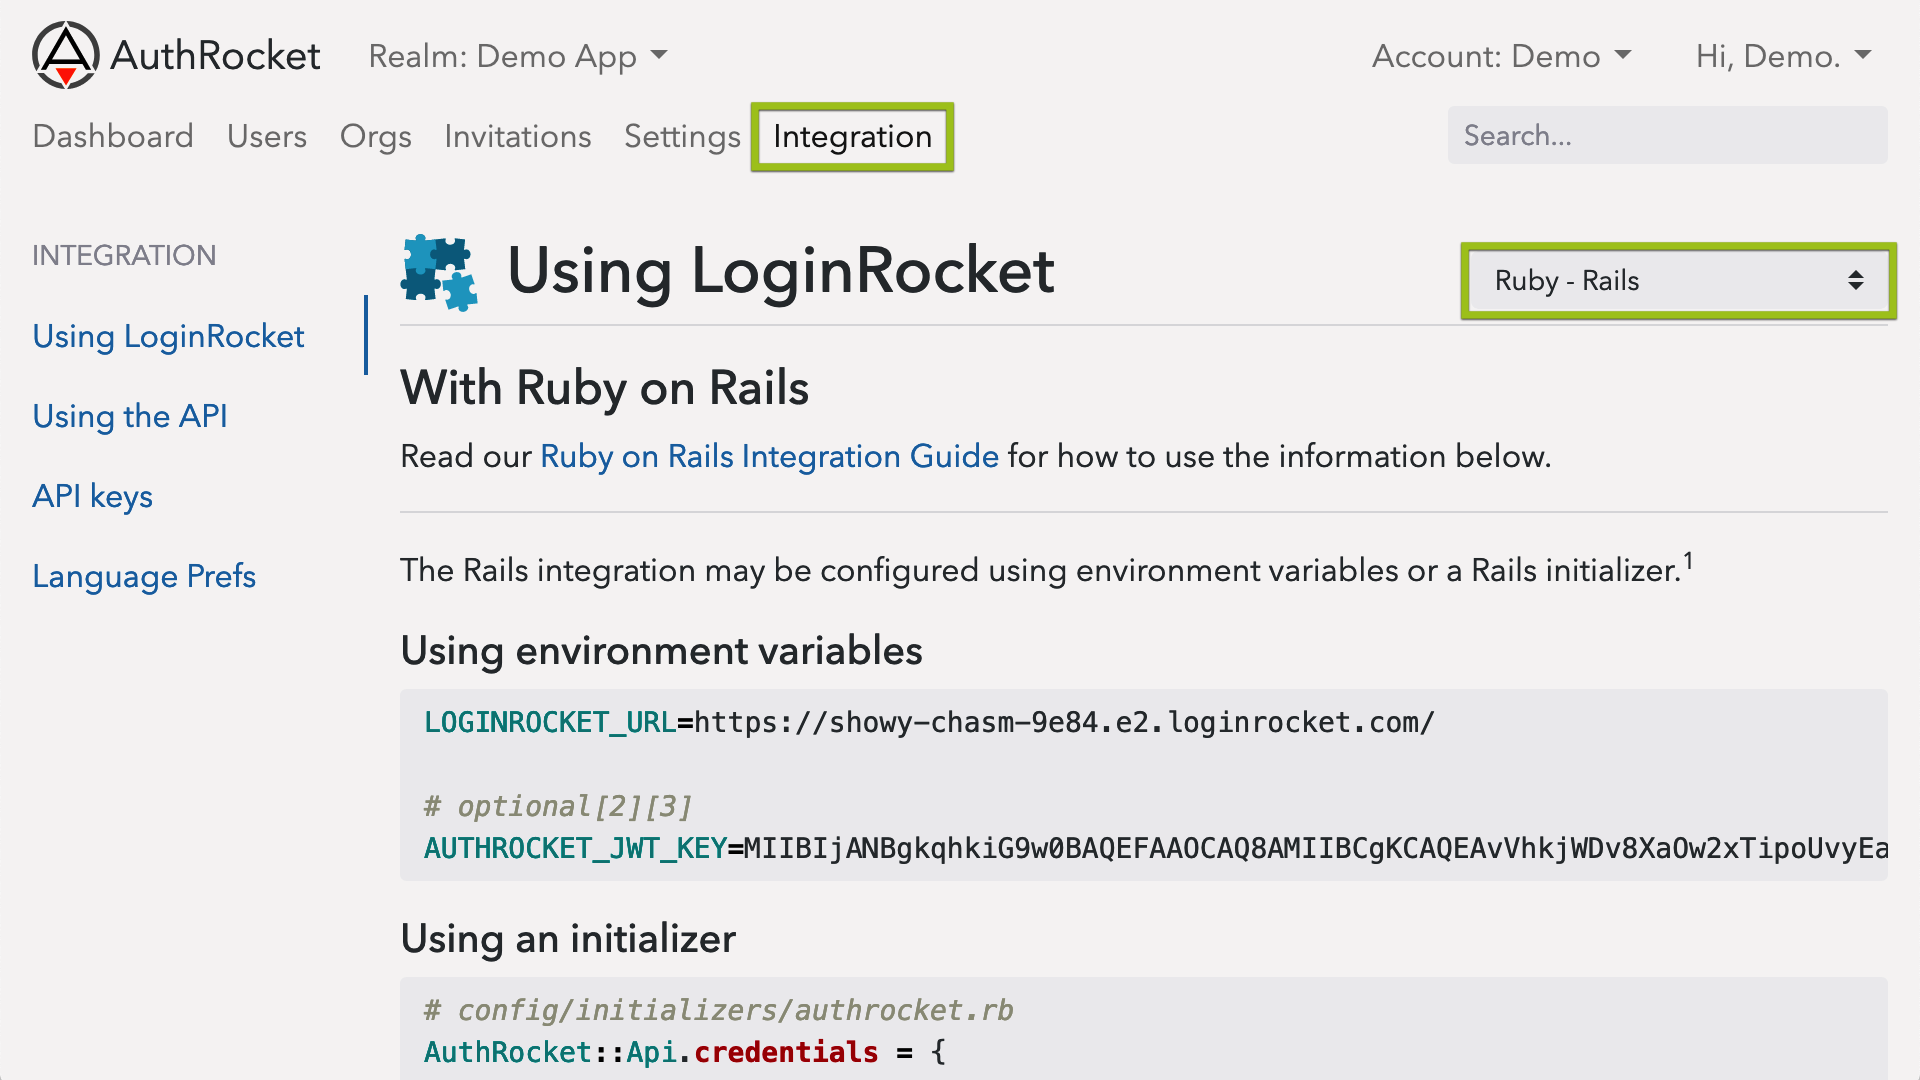
Keep this page open—you’ll need the information here in the next step.
Configuring the gem
Using environment variables
If you use environment variables to configure your app (Heroku, Foreman, Kubernetes, etc), just set the following:
LOGINROCKET_URL=https://YOUR-URL.e2.loginrocket.com/When using foreman for development, simply add the above to your .env.
Remember to restart your Rails server.
Using an initializer
Instead of environment variables, you may also use an initializer. Since your LoginRocket URL is public anyway, it’s perfectly safe to commit this to your git repos.
Create a new initializer at config/initializers/authrocket.rb with the following:
AuthRocket::Api.credentials = {
  loginrocket_url: 'https://YOUR-URL.e2.loginrocket.com/'
}Remember to restart your Rails server.
Protecting your app
The next step is to add before_action to all controllers or actions that should require a login.
Protect the entire app
# app/controllers/application_controller.rb
class ApplicationController < ActionController::Base
  before_action :require_login
end
Protect an entire controller
# eg: app/controllers/profiles_controller.rb
class ProfilesController < ApplicationController
  before_action :require_login
end
Protect only certain actions
# eg: app/controllers/posts_controller.rb
class PostsController < ApplicationController
  before_action :require_login, only: [:create, :edit, :new, :update, :destroy]
    # use Rails' standard options :only and :except
end
As always, you can also use skip_before_action :require_login if needed.
Helpers
The authrocket gem includes a number of useful helpers too.
Links
It’s common to add links like Login, Signup, Logout, and Manage Profile.
<%= link_to 'Login', ar_login_url %>
<%= link_to 'Signup', ar_signup_url %>
<%= link_to 'Logout', logout_path %>
<%= link_to 'Manage Profile', ar_profile_url %>
It’s also possible to return the user to the previous page after managing their profile.
<%= link_to 'Manage Profile', ar_profile_url(redirect_uri: full_url_for) %>If using LoginRocket’s multi-user account mode, these may also be helpful:
<%= link_to 'Manage Account', ar_account_url %>
<%= link_to 'Switch Accounts', ar_accounts_url %>
Current user and account
Access the current session and user:
current_session
# => AuthRocket::Session

current_user
# => AuthRocket::User
current_user.first_name
# => "Dave"
Access the current account (org) and permissions:
# the primary account record is the 'org':
current_org
# => AuthRocket::Org
current_org.id  # account id
current_org.name  # account name
# => "Widgets, Inc."

# permissions are part of the membership:
current_membership
# => AuthRocket::Membership
current_membership.permissions
# => ["forum:moderator"]
current_membership.any_permission?('forum:moderator')
# => true
In multi-user account mode, when the user switches accounts (use ar_accounts_url above), current_org and current_membership will automatically update to reflect the currently selected account.
AuthRocket’s helpers are also available in your controllers.
Example
Using the helpers in a view or layout is pretty familiar.
For example, you might add something like this to app/views/layouts/application.html.erb:
<nav>
  <% if current_user %>
    Hi, <%= current_user.name %>!
    | <%= link_to 'Profile', ar_profile_url %>
    | <%= link_to 'Logout', logout_path %>
  <% else %>
    <%= link_to 'Login', ar_login_url %>
    | <%= link_to 'Signup', ar_signup_url %>
  <% end %>
</nav>
Logins, Permissions, and Accounts
Logins only
Sometimes the above is all you need. If a login is only required for an admin area and you don’t need permissions, just having a valid login may be sufficient.
Logins + permissions
For many more apps, checking permissions is enough. For example:
# app/controllers/admin_controller.rb
class AdminController
  before_action :ensure_is_admin

  # ...

  def ensure_is_admin
    unless current_membership.any_permission?('site:admin')
      redirect_to '/'
    end
  end
end
Connecting to your app’s data
Other times an app has its own concept of an account. In this case, we need to connect that account to AuthRocket’s account/org.
In this example, we’ll assume that you have a local Account model (in app/models/account.rb) that’s persisted to your app’s database. We’ll also assume you want to define a current_account method that loads and exposes this Account.
First, add a column to store the AuthRocket Org ID. If you’re creating a migration, the column might look like this:
add_column :accounts, :ar_org_id, :string, limit: 30
add_index :accounts, :ar_org_id, unique: true
Then add current_account:
# add to: app/controllers/application_controller.rb
def current_account
  @current_account ||= begin
    if current_org
      acct = Account.where(ar_org_id: current_org.id).first
      acct ||= Account.create!(
        ar_org_id: current_org.id,
        name: current_org.name,
        owner_email: current_user.email
      )
    end
  end
end

# make this method availble to your views too
helper_method :current_account
From here, accessing related data is often very straight forward. For example, if Account has_many :articles, simply retrieve them in the relevant controller or view:
current_account.articlesWhat’s next
Logins should now be working with your app! Signups or invitations too, if they’ve been enabled (hint: Realm -> Settings -> LoginRocket).
If you want to enable social login, 2FA, email verification, or anything else, just do that inside AuthRocket. No extra code required!
If you’re stuck, let us know how we can help.